| 
New TriCore BDM frame with adapters - nonanodized
PROBES ARE NOT INCLUDED! Massive and strong aluminum 2019 series ultra quality Tricore BDM Frame that suits all your needs regarding flashing the ECUs. Arm and deck rotation. Flexible usage, lots of transforming possibilities.
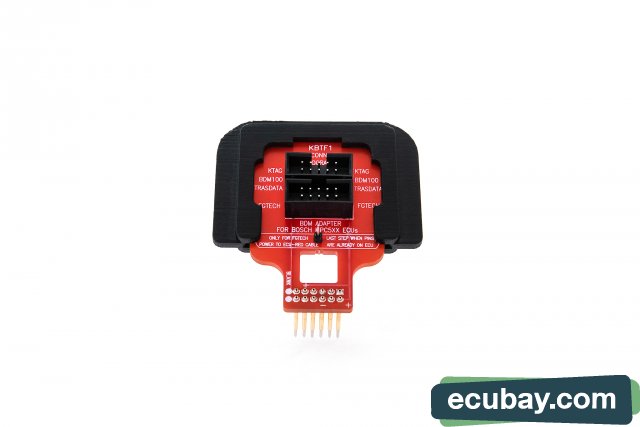
KBTF1
KBTF2
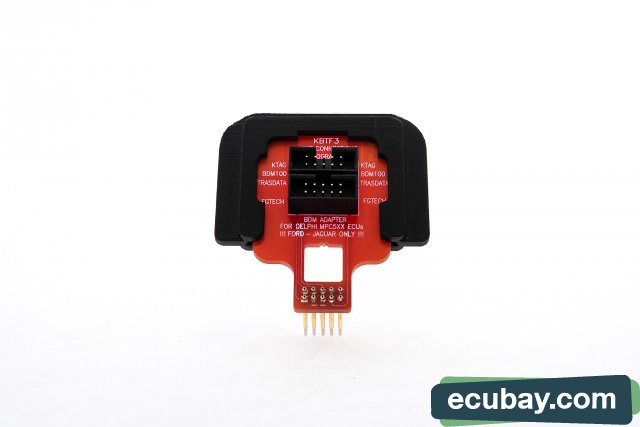
KBTF3
KBTF4
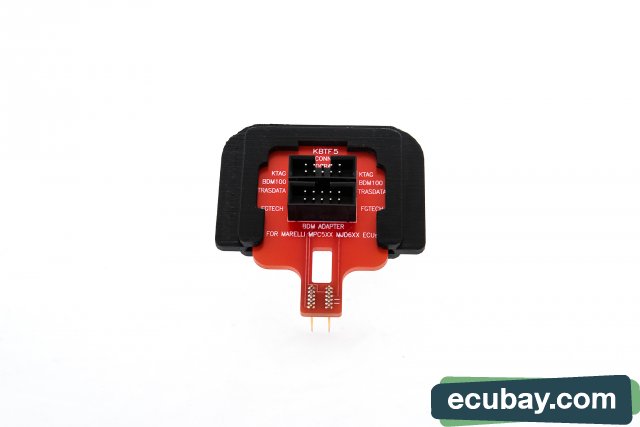
KBTF5
KBTF6
KBTF7
No more wasting time with positioning the ECU. With 2019 series frame, high quality, massive and strong, aluminum Tricore BDM Frame, you can do almost everything what you ever needed when putting your ECU to the desk.
News, differences and lot of improvements. Flexibility, friendly handling, stable, very precise and good place adaptation.
What makes this tool different from other available tools? Why is this tool higher priced than some other available tools? Why should i decide to use 2019 series Tricore BDM Frame instead of cheaper tools? You will find all answers in the next 24 facts.
1. Easy and fast arm and top deck rotation
2. clear surface, friendly for cleaning
3. very massive and huge aluminum tool
4. ergonomic cut out edges for ideal arm position when making vertical movements
5. two axle design - stainless steel hard rods for perfect non sticky smooth movement
6. long vertical and horizontal movement, low minimum height point and high maximum height end point
7. intelligent transforming positions (for adapter using, for soldering, for programming probes using, for making more room on desk, for taking less room in workshop and for transportation)
8. independent all direction movement: up-down, in-out, left-right rotation. Any movement can be stopped/released – controlled; flexible usage
9. all movements are very precise
10. carefully calculated bearing and slider smoothness
11. carefully calculated arm weight for fast and simple usage
12. plexi/deck 180degree flip (plexi holder has 3 functions as holder and as tricore top deck plus illumination deck)
13. strong massive 10mm plexi glass ergonomically shaped with useful curves - useful non sharp cut outs
14. 12v led light on compact 10mm plexi top deck - great illumination, better view
15. two pockets for programming probes and other tools, positioned carefully for fast handling
16. better shaped ergonomic arms, slim, strong and very practical design
17. smoother running, precise movements and very precise pointing
18. rubber legs for good grip to prevent scrolling
19. each product is carefully inspected and tested
20. fast handling
21. user friendly screws position
22. better handling and view on ecu, user friendly stop screws for perfect usage, positioning and fast work
23. rubber shock and noise absorbers for silent and comfortable usage
24. all screws are carefully designed and produced
1. Specification:
General
Main materials: Aluminum (First grade / Class A), Stainless steel 52HRC
Size: L: 350mm X W: 295mm X H: 270mm
Weight: 9.3kg
Color: natural metal
Arm rotation: Yes
Top deck rotation: Yes - Fast Flip
Top deck material: Plexi, transparent, thickness 10mm
Package size: 400mmx400mmx350mm
Electrical conductivity: yes
Thermal conductivity: yes
Surface: clear natural metal
Maximum vertical movement: 110mm
Maximum horizontal (in/out) movement: 170mm
Maximum horizontal (left/right) movement: 180mm
!!! VERY IMPORTANT - READ !!!
3. Powering the led light:
Note that led light must be powered with 12V and maximum voltage must not go over 12.5V, even the light can handle over 13V. Do not tune it!
But keep in mind that going over 12V, will result to very very high temperatures that will melt down plastic, glue, soldered contacts and you can make fire and injuries of yourself or others!This led light is just for usage while connecting the contact to ecu and it is not meant as a non-stop light in workshop. So turn it off each tome when you finished connecting the contacts. Do not forget that! Never leave light turned on without control of the person who used it. Also very strong light can damage your eyes and you can burn yourself very hard. Powering is your own responsibility - totally. We are not responsible for any kind of issues direct or indirect regarding to using or powering the lights and using the electricity.
Informational data:
Proper voltage and normal usage:
Approx. Voltage: 11.5V
Approx current consumption: 0,19A
Approx temperature: 38degrees Celsius
Suggested usage:
Approx. Voltage: 12V
Approx current consumption: 0.22A
Approx temperature: 40degrees Celsius
Satisfied usage:
Approx. Voltage: 12.5V
Approx current consumption: 0.38A
Approx temperature: 59degrees Celsius(already hot)
Not recommended and no guarantee for long term usage, material changes can begin:
Approx. Voltage: 13V
Approx current consumption: 0.40A
Approx temperature: 61degrees Celsius
Do not try! No guarantee.
Approx. Voltage: 14V
Approx current consumption: 0.61A
Approx temperature: 100degrees Celsius(will permanently deform and damage materials and led light). Melt down can begin!!!
Do not try! No guarantee.
Approx. Voltage: 15V
Approx power consumption: 1A
Approx temperature: 170degrees Celsius(total meltdown.
Note that we designed special glue, ergonomic surface of Plexiglas and led holders for led that can indicate over voltage usage. So please do not over voltage it.
(NEVER PUT MORE THAN 12V AND TURN IT ON ONLY WHEN NEEDED, LIGHT IS HELPER ONLY WHILE CONNECTING AND IT IS NOT MEANT AS PRIMARY LIGHT IN WORKSHOP, IF YOU OVER VOLTAGE IT, IT WILL OVERHEAT AND CAN MELT DOWN GLUE AND FALL DOWN, YOU CAN ALSO BURN YOURSELF, ALL RESPONSIBILITY IS FROM OPERATOR WHO PUTS POWER TO THE LED LIGHT, NEVER LEAVE IT TURNED ON WITHOUT CONTROL)
4. Usage tips by steps:
- stop arm in a suitable angle and length
- while vertically approaching ecu - move ecu and not arms, that way you will be very fast and more precise
- when you press the pogopins to the ECU, you can use only the weight of the arms without pressing it more towards ECU, as arms are heavy enough to make perfect contact in most cases, but if you do wish to press more towards ECU, lock the horizontal movement on the both sides at the same moment - not only on one side!
5. Hints:
- use only one dimension movement at once, keep other movements blocked with all available screws
- while connecting use only vertical movement
- always move ecu left/right, in/out and move arms up/down
- when connecting to ecu keep rotation / horizontal movement blocked
6. Package content:
A) 2019 series TriCore BDM frame
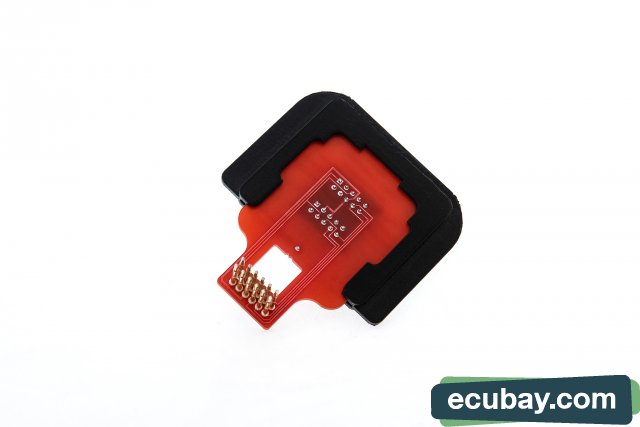
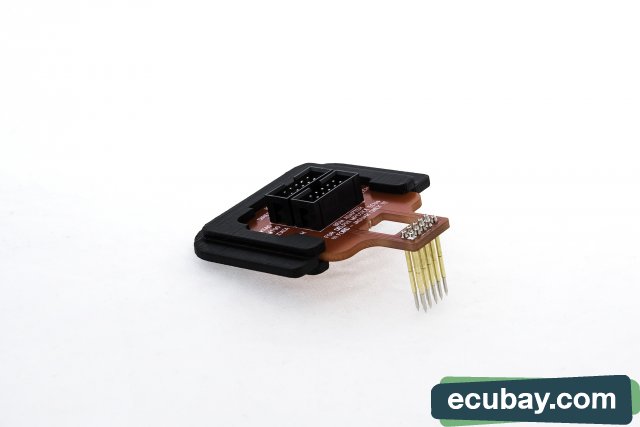
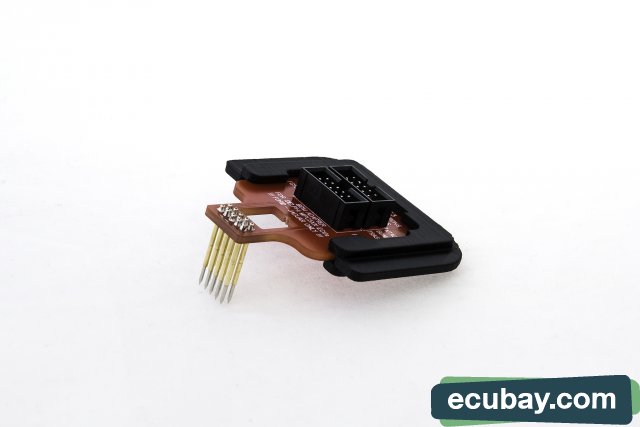
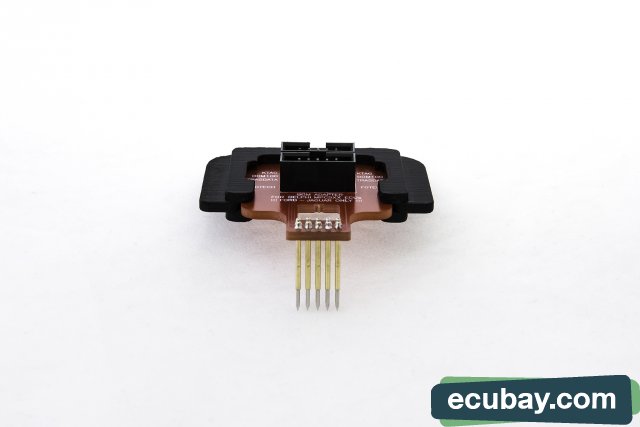
B) SET OF BDM ADAPTERS
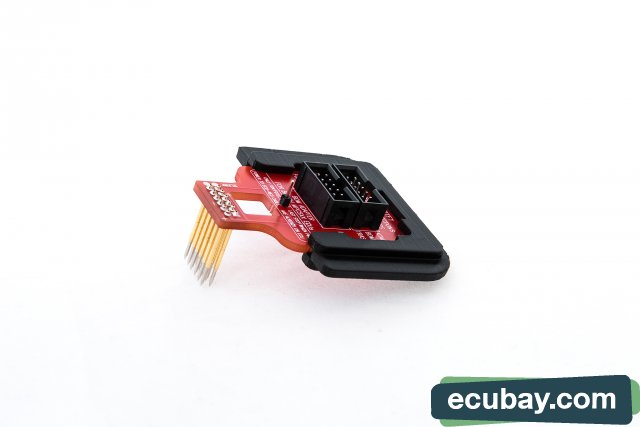
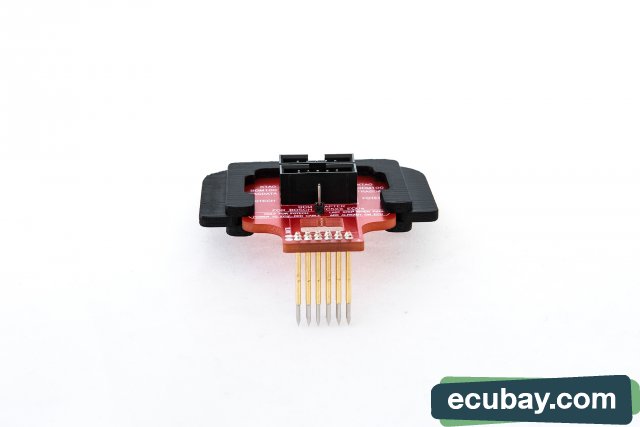
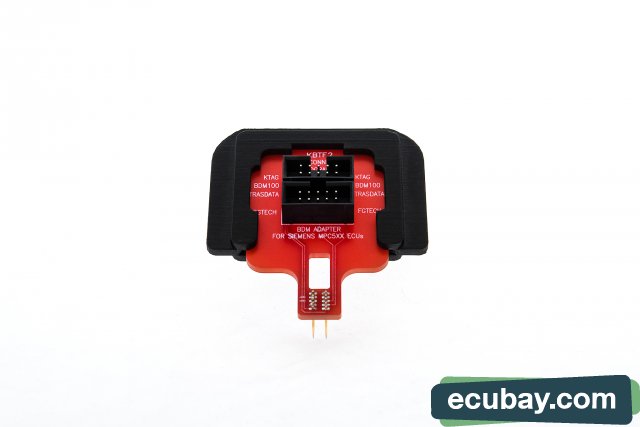
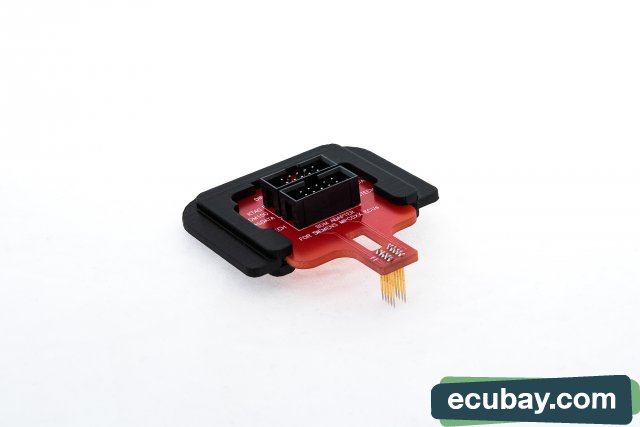
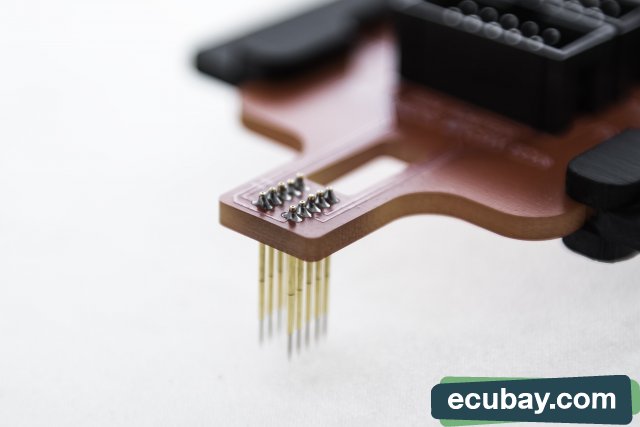
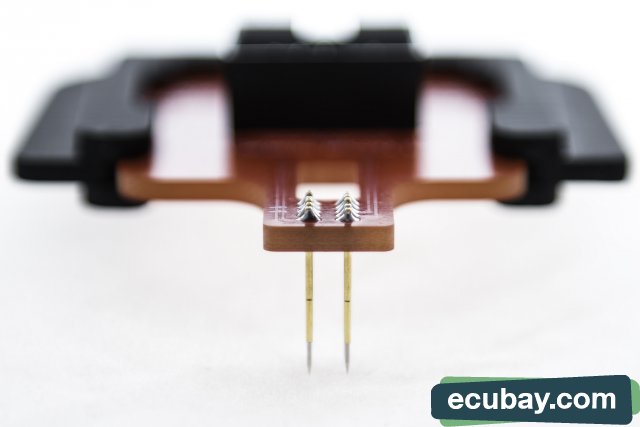
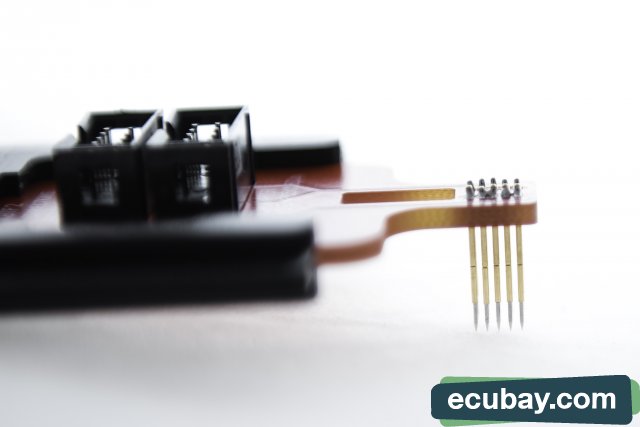
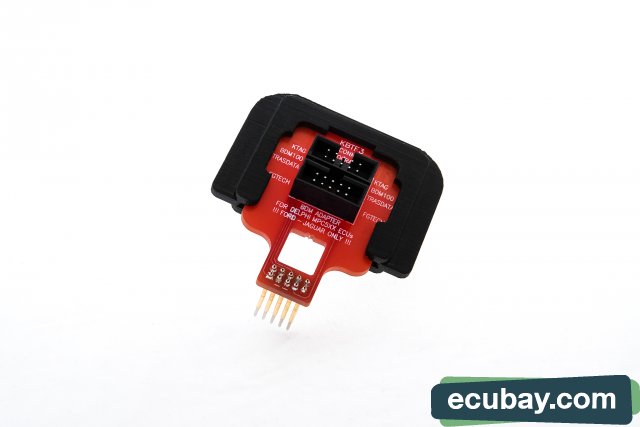
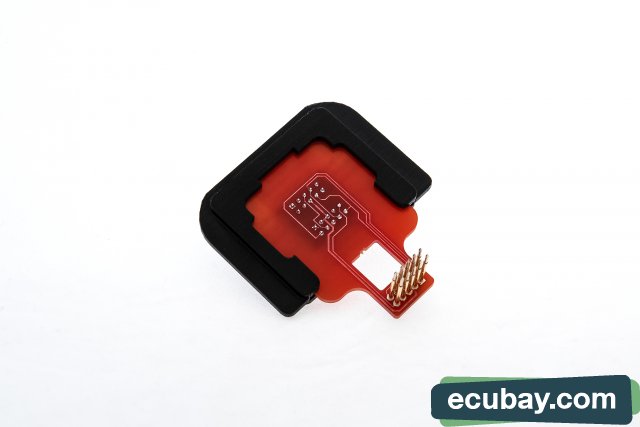
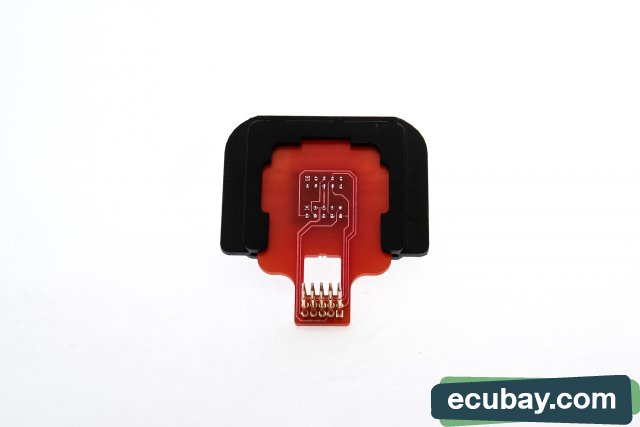
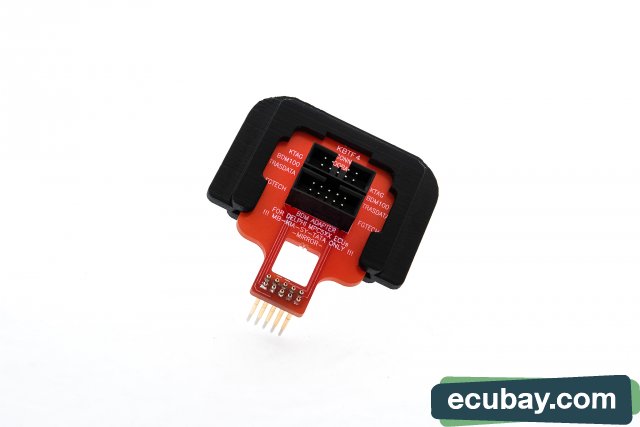
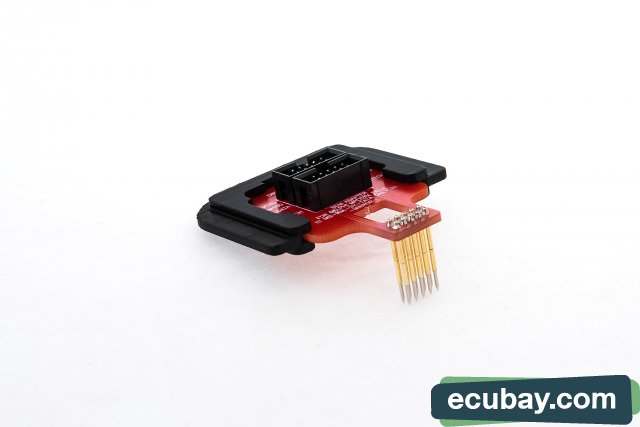
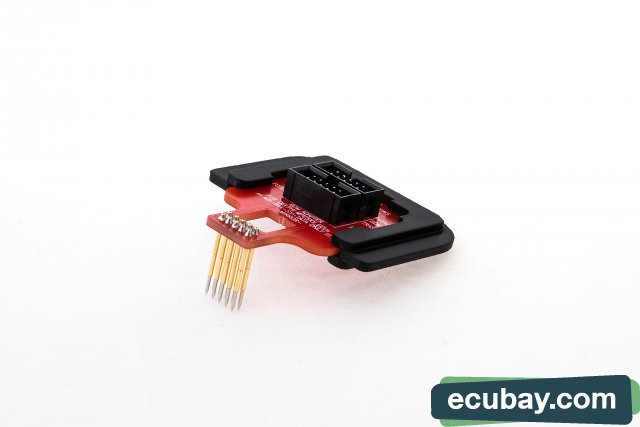
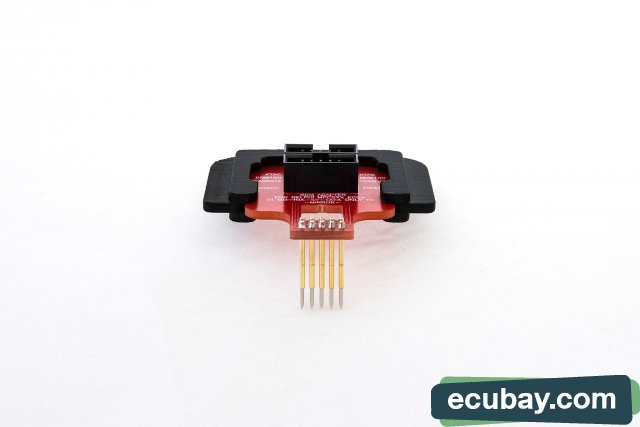
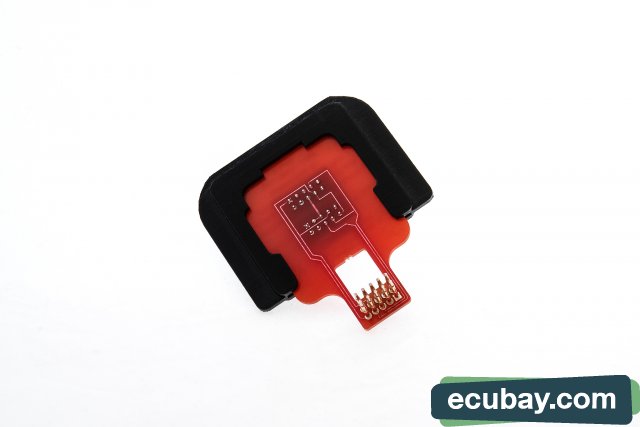
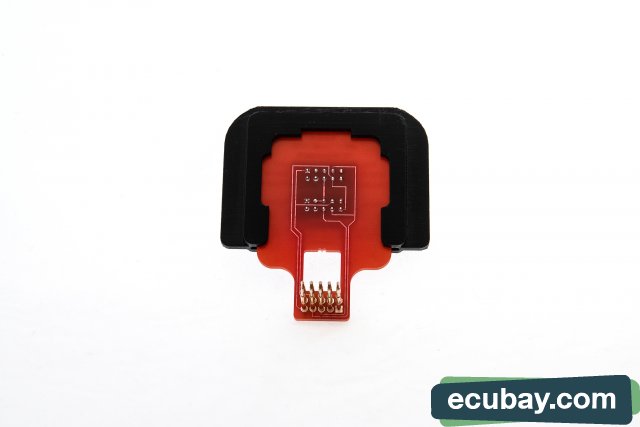
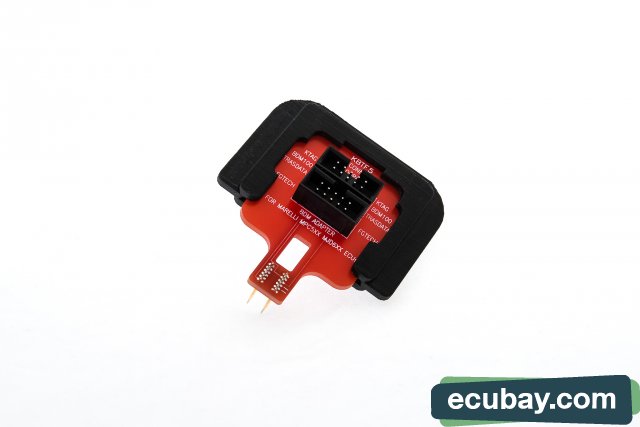
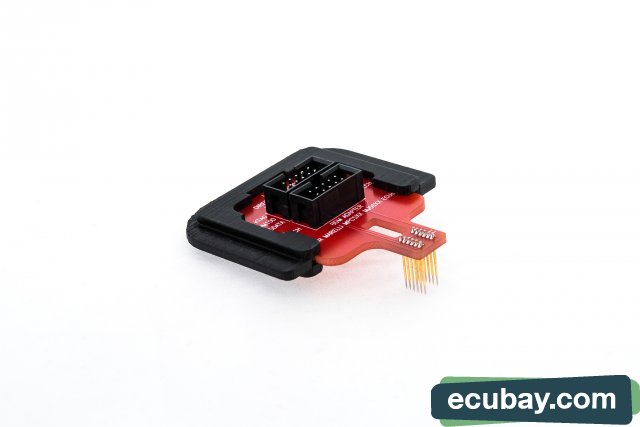
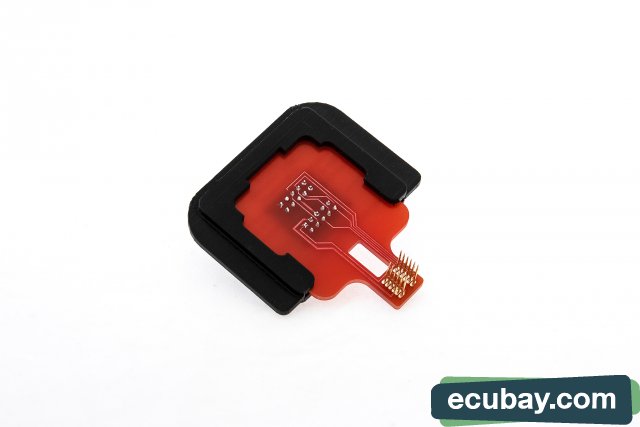
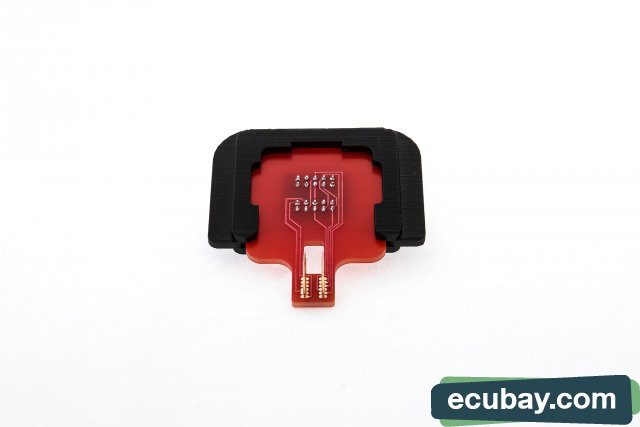
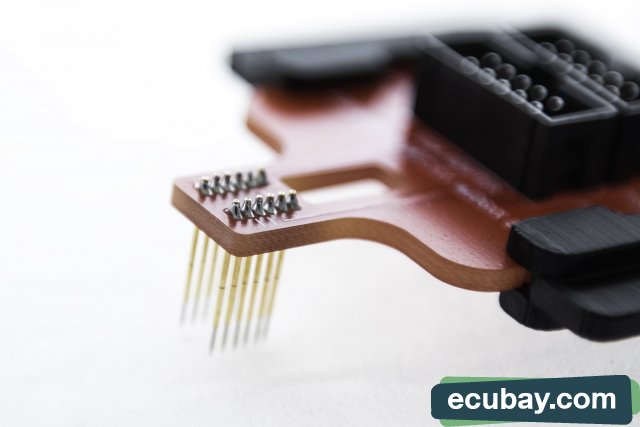
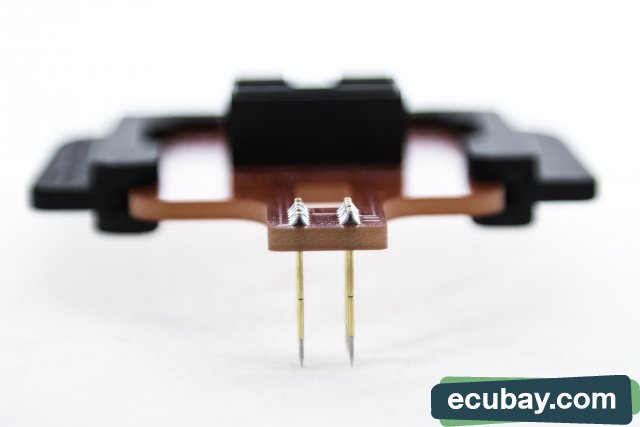
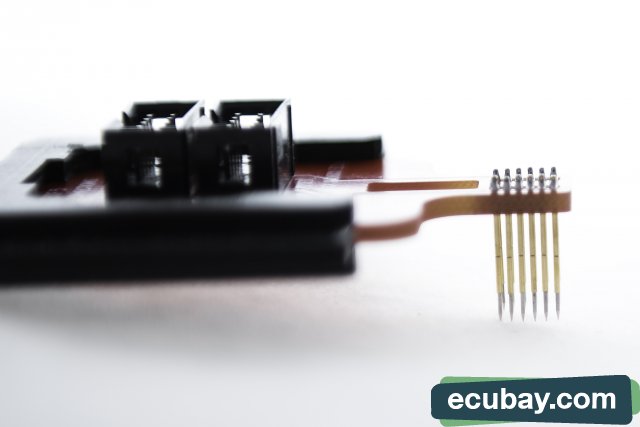
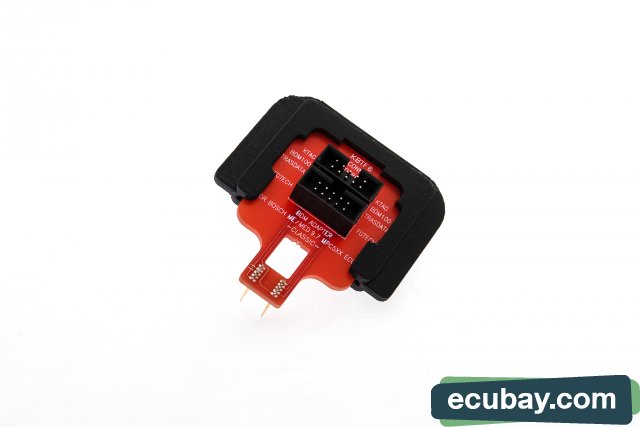
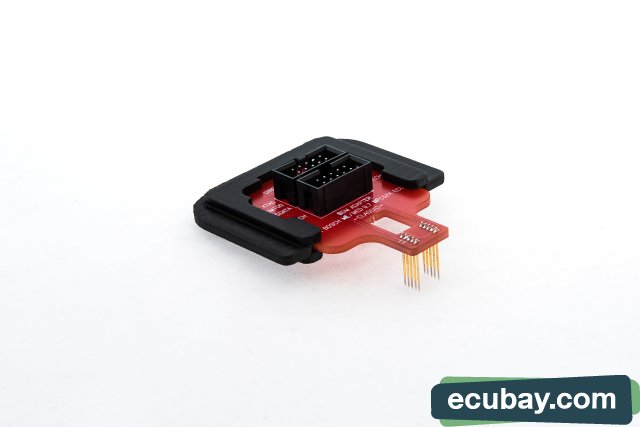
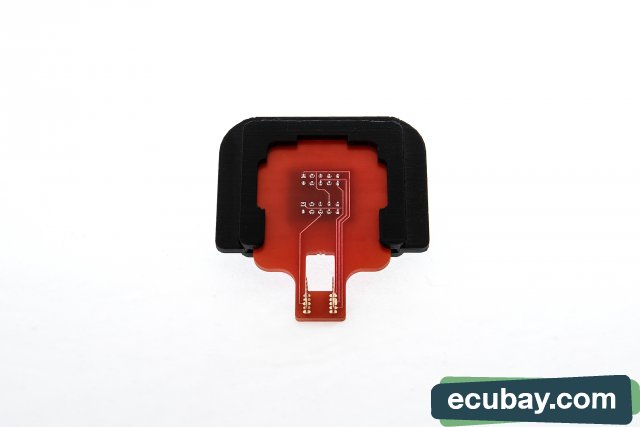
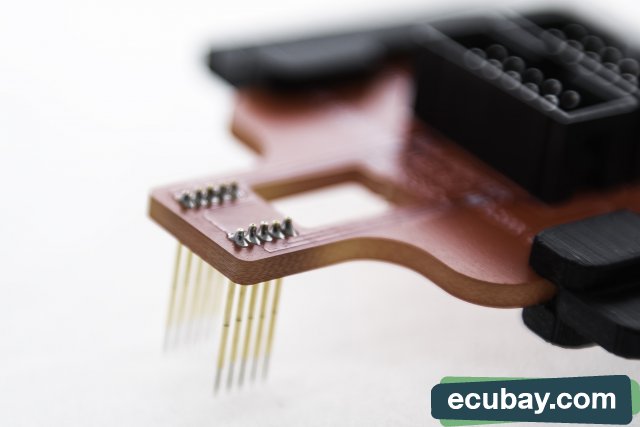
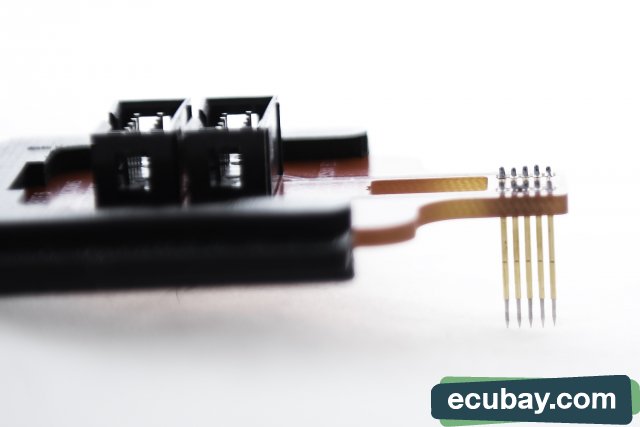
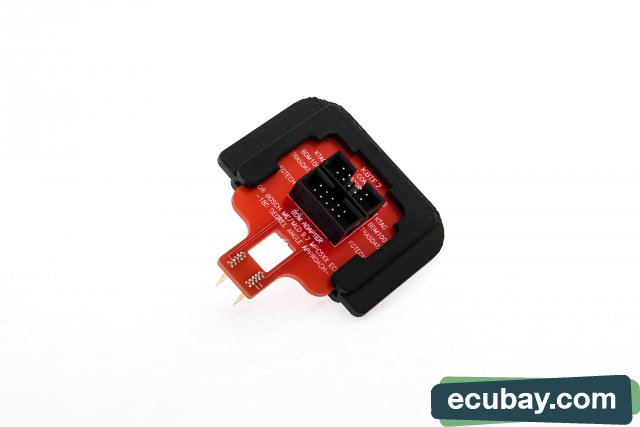
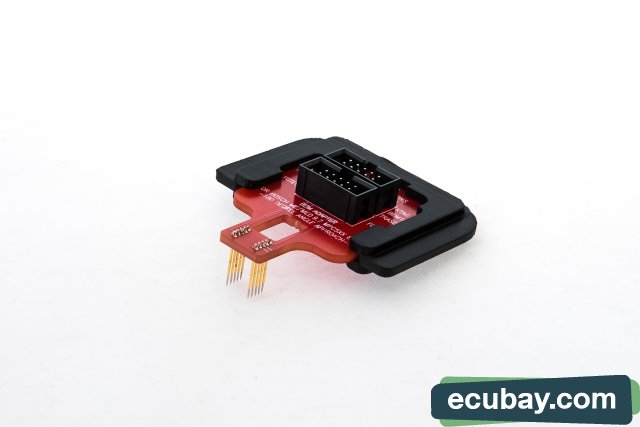
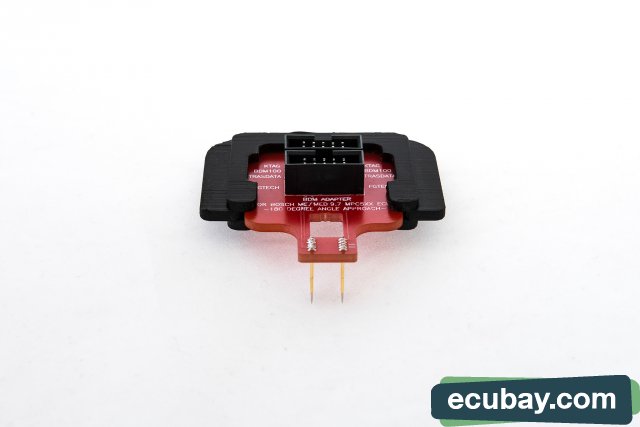
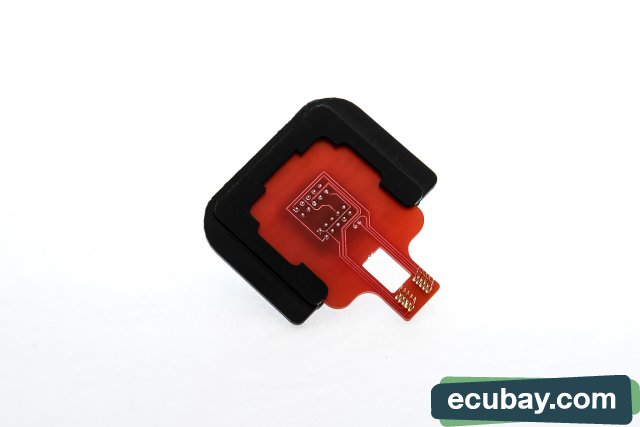
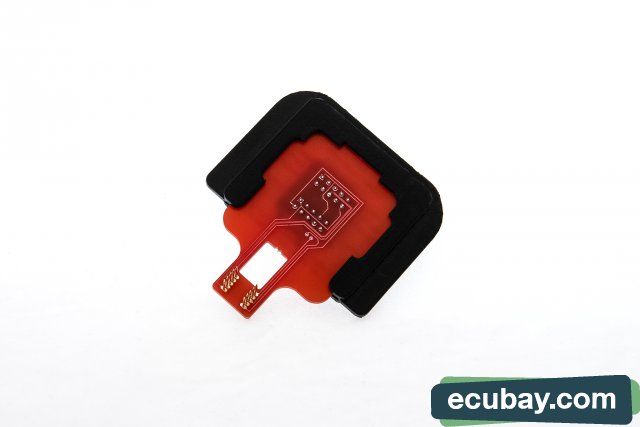
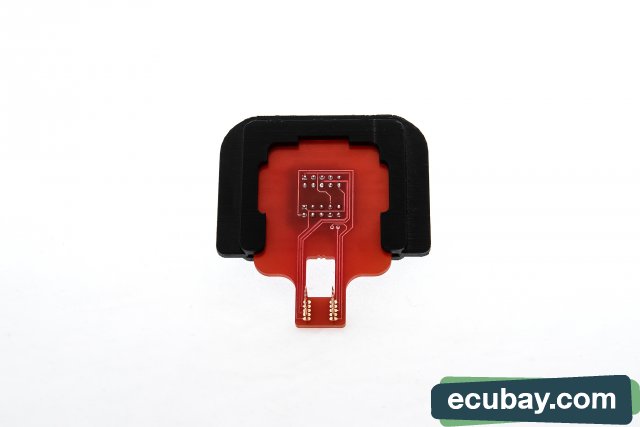
Complete set of 7 - seven BDM 4 in 1 adapters supports KTAG, TRASDATA, BDM100 and FGTECH programmers. Precisly designed BDM adapter for safe and very fast handlig that minimises the risk while connecting to Engine Control Unit BDM pins.
Attention!
We offer 2 different dimensions of the adapter. Standard size 6cm wide and NON-Standard size 4cm wide. Please be sure that you choose the right size. If you are not sure which one you need,
measure width of adapter holder on your BDM frame. Standard size comes with black protector and NON-Standard has no protector.
No more tuning only over OBD, expand your business and cover more vehicles.
Technical specification
- supports KTAG, TRASDATA, BDM100 and FGTECH programmer
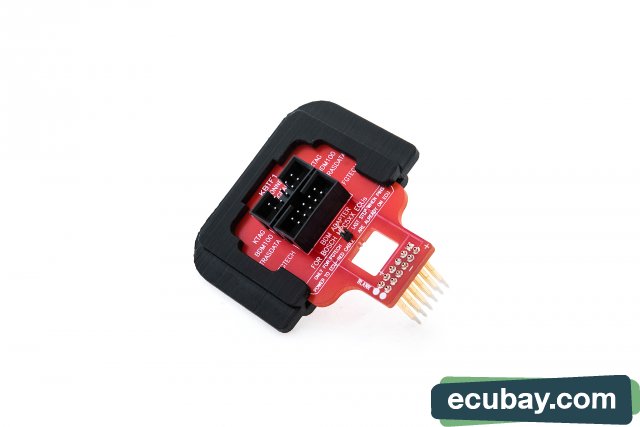
- BDM adapter for Bosch MPC5xx ECUS (KBTF1)
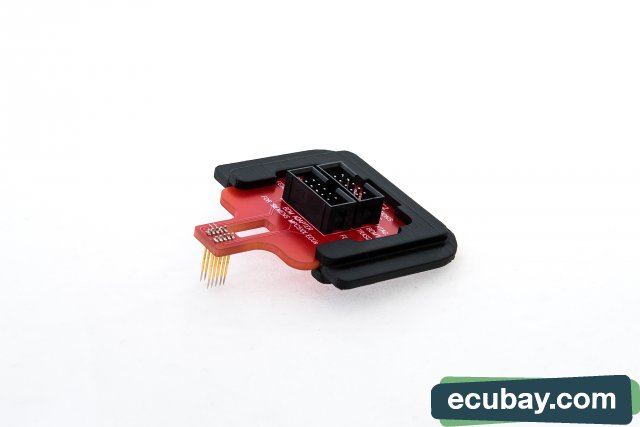
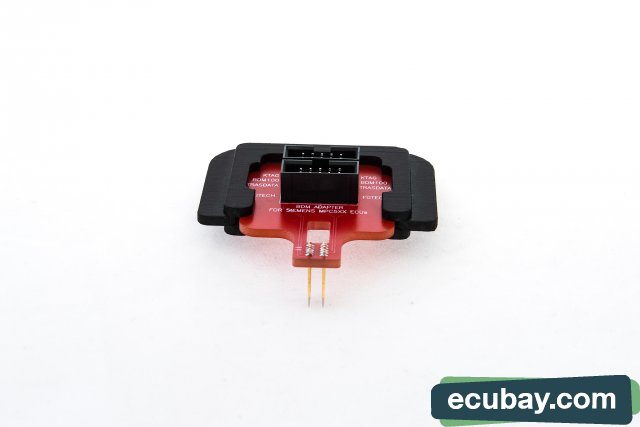
- BDM adapter for Siemens MPC5xx ECUs (KBTF2)
- BDM adapter for Delphi MPC5XX Ford-Jaguar ECUs (KBTF3)
- BDM adapter for Delphi DCM3.2 ECUs (KBTF4)
- BDM adapter for Marelli MPC5xx MJD6xx ECUs (KBTF5)
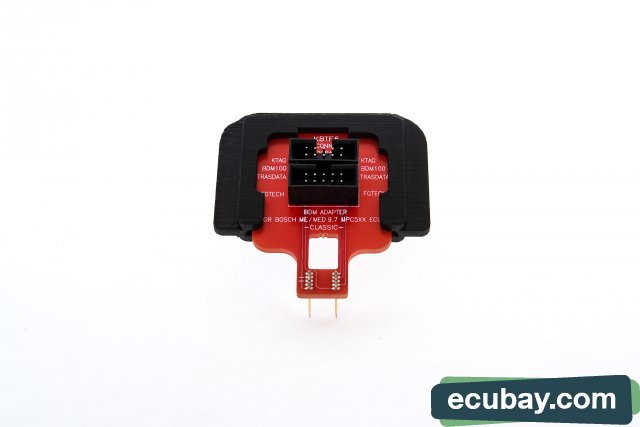
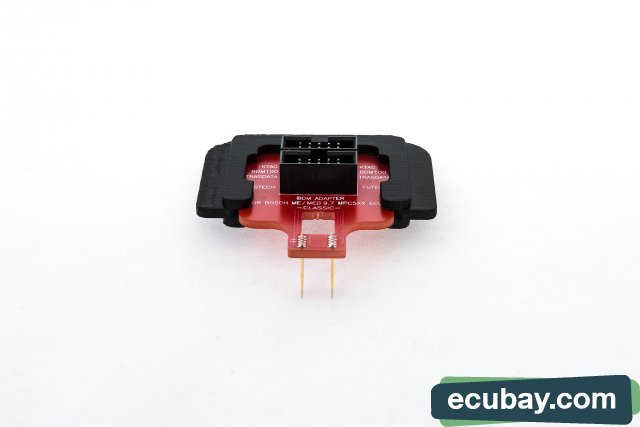
- BDM adapter for ME/MED9.7 MPC5xx ECUs with proper angle approach (normally in Mercedes ME/MED9.7 (KBTF6)
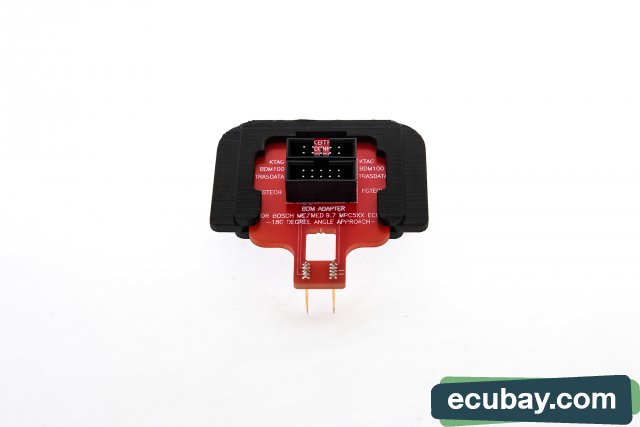
- BDM adapter for ME/MED9.7 MPC5xx ECUs with 180degree angle approach (normally in Ford Me9.7) (KBTF7)
- awailable in 2 different dimesions 6cm or 4cm wide, please be carefull when choosing adapter size
- standard 6cm size adapter is classic adapter and it comes with black protector, the non-standard 4cm adapter comes without black protector
- direct connection to programmer - plug your programmer directly to adapter and start reading or writing
- cut out windows for viewing and getting natural light dropping towards pins and avoiding light reflection
- clear view of the ECU BDM connector simplifies positioning of the adapter
- very important cut out edges very close around the pinouts for great view while connecting to the ECU
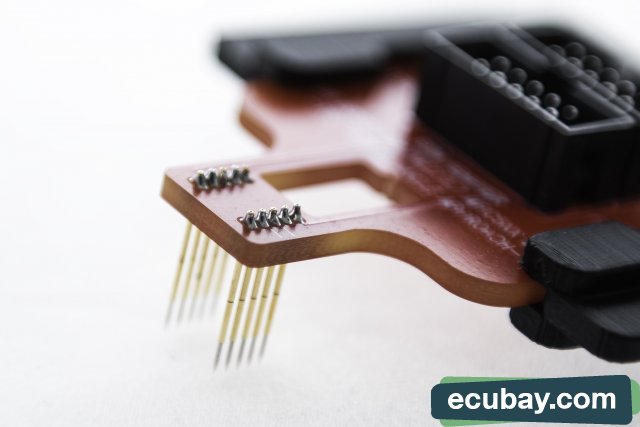
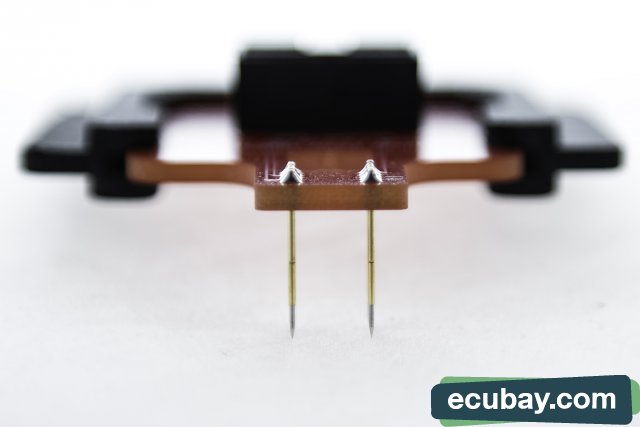
- ground marked on the PCB so you can be sure if you turned adapter properly by measuring ground on ecu housing or pinout
- white markings for identification purposes
- QR code with ECU support list so you can simply scan code and check if adapter supports ECU you are interested in
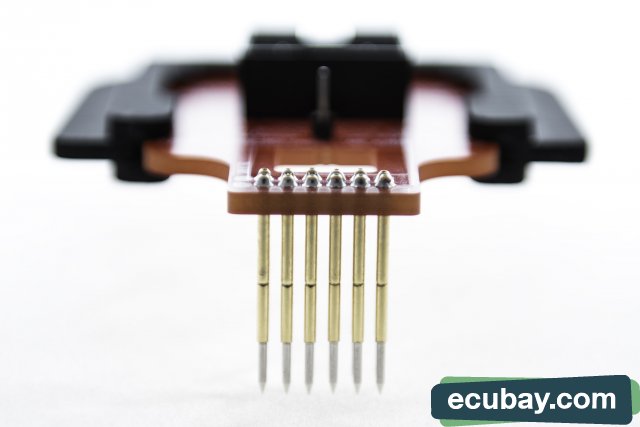
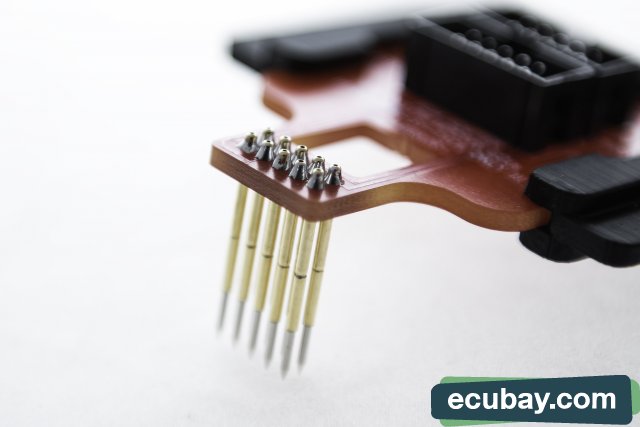
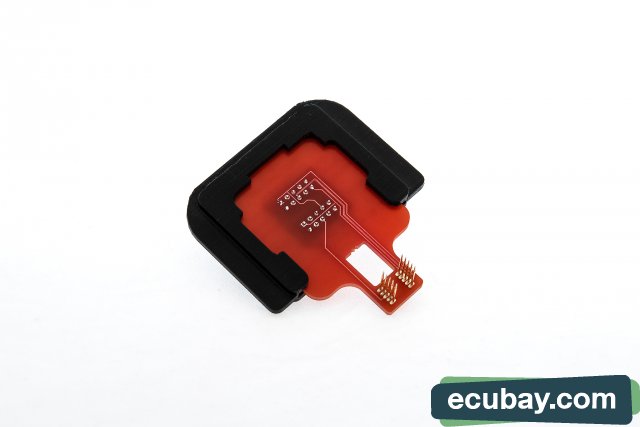
- supports stable and precise connection - with 2.5mm PCB there is no bending
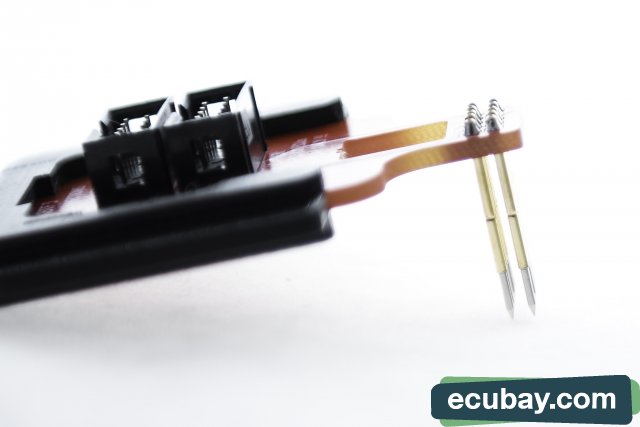
- reliable contact with precise golden pogopins
- very good impact resistance and nice handling with smooth PCB rounded edges
- basic safety warrnings and usage notes are written on PCB
- possibility of branding the item with your logotype (please contact us first and we will make aprooval for that)
- adapter color: red with white print
- full package weight: 1000g
- full package dimension: 5cm x 33cm x 27cm
- package color: white
ECU Support list
KBTF1 adapter
EDC16
EDC16+
ME9 BMW
ME9+ BMW
ME9 BMSK BMW
ME9+ BMSK BMW
ME9+ VAG
ME9x OPEL
ME9.x Chevrolet
MED9.6.1 Ferrari
EDC7U31 IVECO
KBTF2 adapter
SID 201 - 203 – 204
SID 206 Ford – Volvo
SID 301 Renault
SID 803
SID 803A
SID 803A
SID 902 Ford
SID 904 International
Continental SIM2K
SIM 90T Chrysler - Dodge
Simos PPD1X VAG
MS45 BMW
MSS60 - MSS65 BMW
MSV70 - MSS70 BMW
KBTF3 adapter
Deplhi MPC555 and MPC561 - FORD/JAGUAR TDCI
Motorola Perkins ECUs - Massey Ferguson
KBTF4 adapter
Deplhi DCM3.2 Mercedes
Deplhi DCM3.2 Kia
Deplhi DCM3.2 SsangYong
Deplhi DCM3.2 Tata
KBTF5 adapter
Marelli MJD 6F3
Marelli MJD 6JF
Marelli MJD 602
Marelli MJD 603
KBTF6 adapter
ME9.7 MED9.7 MERCEDES
ME9.7 ECUs with proper angle approach
KBTF7 adapter
ME9.7 MED9.7 Ford
ME9.7 ECUs with 180degree angle approach
Comparison information and notes
KBTF1 adapter
Compatible input/output with 14AM00T01M KTAG adapter
Compatible input/output with F34DM002 Trasdata adapter
Compatible input/output with BDM143 EVC BDM100 adapter
KBTF2 adapter
Compatible with input/output 14AS00T03S and (Adapter 14AM00TBAS with pull-out insert 14AM00TB01 ) KTAG adapter - on proper plug
Compatible with input/output (F34DM003 Base Adapter 1.27 + F34DM004) Trasdata adapter - on proper plug
Compatible input/output with BDM141 EVC BDM100 adapter - on proper plug
KBTF3 adapter
Compatible input/output with 14AM00T00M KTAG adapter
Compatible input/output with F34DM001 Trasdata adapter
Compatible input/output with BDM142 EVC BDM100 adapter
KBTF4 adapter
Compatible input/output with 14AM00T02M KTAG adapter - on proper plug
Compatible input/output with F34DM009 Trasdata adapter - on proper plug
Compatible input/output with BDM147 EVC BDM100 adapter - on proper plug
KBTF 5 adapter
Compatible input/output with 14AM00TBAS with pull-out insert 14AM00TB02 KTAG adapter - on proper plug
Compatible input/output with F34DM003 with pull-out insert F34DM005 Trasdata adapter - on proper plug
Compatible input/output with BDM144 EVC BDM100 adapter - on proper plug
KBTF6 adapter
Compatible input/output with 14AM00TBAS with pull-out insert 14AM00TB02 KTAG adapter - on proper plug and orientation checked!!!
Compatible input/output with F34DM003 with pull-out insert F34DM005 Trasdata adapter - on proper plug and orientation checked!!!
Compatible input/output with BDM144 EVC BDM100 adapter - on proper plug - on proper plug and orientation checked!!!
Classic angle approach (normally in Mercedes ME/MED9.7)
User manual
KBTF7 adapter
Compatible input/output with 14AM00TBAS with pull-out insert 14AM00TB02 KTAG adapter - on proper plug and orientation checked!!!
Compatible input/output with F34DM003 with pull-out insert F34DM005 Trasdata adapter - on proper plug and orientation checked!!!
Compatible input/output with BDM144 EVC BDM100 adapter - on proper plug - on proper plug and orientation checked!!!
It is 180 degree rotated compared to KBTF6
User manual
1. First press adapter to ECU without any cables attached on the adapter
2. To be sure if you turned adapter properly always measure pogopin with ground marking "-" towards ECU housing or ground pin on ECU connector. Mesaure it with multimeter - resistance beeper and if it beeps than you are 100% sure you turned adapter properly. For BOSCH ecus connected with KBTF1 first left line on ECU pads should newer be connected. ALWAYS follow your programmer instructions / user manual. All of our adapters have ground marking on pogopins with sign minus "-". That is helper if you are unsure that you turned ECU/Adapter properly. You can alway check it that way.
3. When your adapter is properly pressed to the ecu, connect flat cable that comes directly from programmer to PROPER plug, if you connect the programmer to wrong plug you will burn ECU for sure.
4. Once adapter and cables are connected you can start with reading and writing. Always folow your programmer instructions.
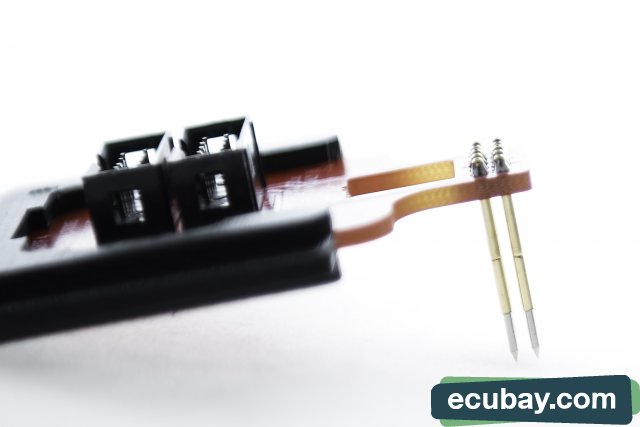
5. For FGTECH programmer and BOSCH KBTF1 adapter ONLY - Once adapter is pressed to the ECU, flat cable is connected and FGTECH software is opened: You need to put red cable from FGTECH cables that is equipped with switch to the + pin in the middle of the adapter and when you put switch ON - ECU will get power. That must be LAST STEP, because if you put power first and than if you will make positioning towards ECU you will burn ECU!!! Only FGTECH does not provide power from its pinout so power needs to be connected with cable to pin with marking "+".
Package content:
- 1x adapter BDM adapter for Bosch MPC5xx ECUs - KBTF1
- 1x adapter BDM adapter for Siemens MPC5xx ECUs - KBTF2
- 1x adapter BDM adapter for Delphi MPC5XX Ford-Jaguar ECUs - KBTF3
- 1x adapter BDM adapter for Delphi DCM3.2 ECUs - KBTF4
- 1x adapter BDM adapter for Marelli MPC5xx MJD6xx ECUs - KBTF5
- 1x adapter BDM adapter for ME/MED9.7 MPC5xx ECUs with proper angle approach (normally in Mercedes ME/MED9.7) - KBTF6
- 1x adapter BDM adapter for ME/MED9.7 MPC5xx ECUs with 180degree angle approach (normally in Ford Me9.7) - KBTF7
- 7x user manual
Warnings:
Requires some basic knowledge for handling.
Make sure the connections towards ECU is properly turned. Use ground markings "-" to check orientation.
You should triple check that the ground and power pins are in correct place, see you BDM pinout. Do not plug the power before you press pogopins to ECU.
- use only one flasher/programmer at the time
- use only one connector connected to the flasher at the same time
- be careful not to reverse polarity in any case
- do NOT make short circuit
- do NOT leave the adapter on conductive material to avoid short circuits
- use only for mention purposes - reading and writing the ECU with 4 mentioned flashers/programmers
- do not bend the pogo pins
- do not eat
- do not burn
- do not expose it to heat or fire
- do not expose to the high voltage
- do not expose to direct sun light
- do not clean with chemicals
- pogo pins are very sharp and can make injuries
We do not take any responsibility (direct or indirect) for damages on your ECU by wrong usage, mistakes, accidents or any kind of interrupts, interference or coincidences (predictable or not predictable).
Howewer, our products are high quality products that will satisfy your needs and standards. Use it with care any you will never have problems
We do not take any responsibility (direct or indirect) for damages on your ECU by wrong usage, mistakes, accidents or any kind of interrupts, interference or coincidences (predictable or not predictable).
How ewer, our products are high quality products that will satisfy your needs and standards. Use it with care any you will never have problems. |

.jpg)
.jpg)
.jpg)
.jpg)
.jpg)
.jpg)
.jpg)
.jpg)
.jpg)
.jpg)
.jpg)
.jpg)
.jpg)
.jpg)
.jpg)